In the first part of this blog series, we discussed Continuous Integration (CI) and Continuous Deployment (CD) at a high-level, and how these processes benefit teams that need to be able to deploy rapidly. In this post, we’ll discuss CI with regards to Jira cloud and Bitbucket cloud and how a team can set up the process. So let’s dive in.
Application Links
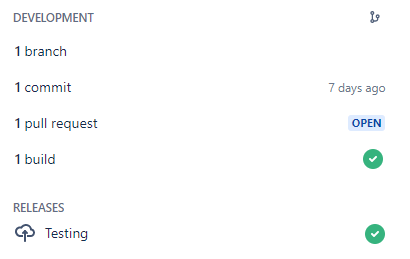
In order to get Atlassian tools to work together (in this case, Jira Software and Bitbucket), an application link will need to be created between them. In Jira cloud, this is set up under the project settings page in the Development Tools section. Here you will be able to connect to Bitbucket Cloud or Server, Bamboo, GitHub, or FishEye/Crucible. For our discussion, we are connected to a Bitbucket cloud offering. Once this connection is established, we will have a new section that displays in our Jira issue view, on the right side under the Development section. This will save time because we can create a branch from this section in the Jira issue rather than going to another application to create a branch.

Creating Branches
As an example, let’s say that sprint planning has been completed, and the sprint has been started in Jira. As a developer, I open my first issue in the sprint, then click “Create branch” under development. Now a couple things are going to happen. One, a new branch is going to be created from the Bamboo repository, and two, the issue is going to automatically transition to an “In Progress” status.
Let’s talk about the first step. A window will open with some fields to be selected and I will select a repository, a branch type, where to branch from, and my branch name will be automatically populated with my Jira issue number and the title of my issue. The branch types are set up in Bitbucket and default to Bugfix, Feature, Hotfix, and Release, but they can be edited if needed. I will select “Feature” as I am working on a new feature in this sprint. Secondly, in our workflow for Jira, we created a trigger called a create branch trigger. So now when I click “Create branch” under the development section, my Jira ticket moves to the “In Progress” status without having to click another button. As you can see, we are already saving time!

Start Development
Now we move on to the next steps of our process. I clone the repo to my local environment and begin my development. Once I have finished my development, I commit my changes and push up my code to the repository. Now, under the development section, I can see my branch and my commit. This section will also show any builds that have run, but we will discuss that in our next post.
In this example, let’s assume that the build ran, all tests passed and we are ready to create a pull request.
1) I go into my Jira ticket, click on any of the links under the Development section and a new window will open. From this window, I can see commits, builds, pull requests, branches, and several other tabs that relate to development.
2) I click on the pull request tab and then click “Create pull request”. A new window will open with fields to enter data for a pull request. AlI of the information has already been entered from our Jira ticket, so I don’t need to enter anything unless I have changes. I have already set up default reviewers, so the pull request will already be assigned, which saves me time. This can all be set up in the Bitbucket repo. Now we have a pull request that is getting reviewed.
3) Once reviewed, it will be merged back into our master branch or we could choose a release branch to merge it into, depending on the process that each team follows. I pulled mine into master, as we deploy our master branch to production several times per day.
A couple of things happened behind the scenes. First, my Jira task was automatically transitioned to the next step in my workflow because we used a pull request created trigger. Secondly, notifications were sent out to reviewers to let them know about a pull request that needs to be reviewed, and any notifications set up for shareholders or project mangers were sent out to let them know of status changes to the task.

As you can see, having Jira and Bitbucket linked can save time! Through the use of workflow triggers, we can automate a number of tasks that would normally require a user to go in and click buttons. At the end of the day, I know we all want to click fewer buttons! I hope this post is helpful in shedding a little light on a few of the things that are possible by simply linking Jira and Bitbucket and using a few workflow triggers. Watch for my next post (Part 3), which will go into the Continuous Delivery process.
